
 My journey began when I decided that my lab needs were not being met through outsourcing, and I came across the new Sony DR-150 being sold by Imaging Spectrum, whose folks I met at the PPA ImagingUSA event early in January. I ordered this to decrease my reliance on my outsourcing lab, not for a photo booth operation, but ended up deciding it would work great for this project.The results were amazingly fast, and here’s the blurb from the ImagingSpectrum folks about the printer’s capabilities:
Sony’s fastest dye sub printer, which offers high-volume roll printing, durable print heads, and a simple front-access design, is now available for a net price of $305 (after mail in rebates)! Buy a Sony 150 before March 31 and get via mail, a $250 rebate, 2 cases of 4×6 paper ($470 value), and 2 cases of 5×7 paper ($770 value). The UPDR150 prints 4×6 images in about 8 seconds, 5×7’s in ~15 seconds, and 6×8’s in approximately 20 seconds.To get your own, contact Steve at ImagingSpectrum.com, click that link.
 My next step was the software necessary for immediate gratification. We of the now digital age want to see our files within seconds. This printer doesn’t disappoint, but getting the files from camera to print was the challenge. In steps Tim at TriPrism, who has this amazing TEPS-X software that delivers files from shutter release to media in about 20 seconds total.
First, the setup:
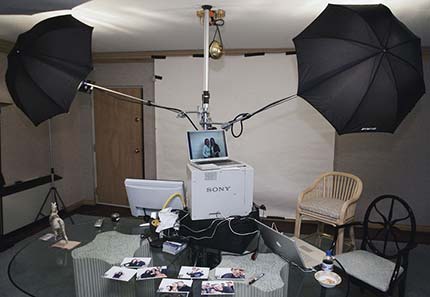
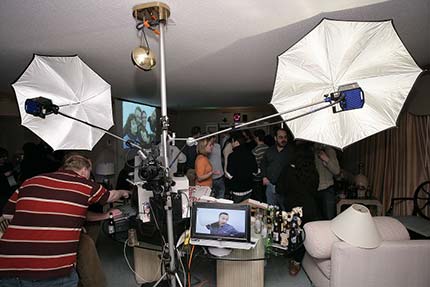
Here , you’ll see how Baltimore Sun phototojournalist David Hobby produced repetitive 5×7’s and continued to photograph himself with them. Hobby also writes the blog Strobist.com.
Here are ONE, TWO, and THREE examples of people that are posing WITH their 5×7’s with the software-added event logo overlay.
Here, you can see almost all of the images that were printed during the weekend.
For the subject’s instant preview of their self-portrait, I used my own external 20″ Visio monitor (seen to the right of the autopole in the second image), with s-video in for previews. About $400 at Costco. This was critical for people’s interaction with the setup, and s-video was important as that was the video out from the laptop.

I have since placed an order for this ZigView from Penn Camera, which, with the accessory removable 2.5″ LCD screen, will let people see themselves in the viewfinder as they are arranging themselves. I have other uses for this, of course, I am not buying it for this rig, but I know it will be helpful.
Laptop 1 – Primary 17″ laptop. USB port 1 goes to Camera, USB Port 2 goes to a USB hub that connects the printer via USB and the necessary USB Software Authentication Key that comes with the printing software. Since you can find a USB hub anywhere, I’m just sayin you need one, otherwise, you’re one port short, since you need the USB authorization key, printer, and camera plugged in at all times.
Laptop 2 – Secondary 15″ laptop. I was only able to find one way to automatically have the images (on a Mac), AS THEY ARE SHOT, refresh, and it was using the “desktop images folder” set within system preferences to do that. All other applications, once you started the slide show, it only accessed whatever images were in the folder when the slideshow started, even the screen saver. This laptop connected wirelessly to the 17″ laptop, mounting it as a network drive, and then used as the source for “desktop images” the folder that is created by the software that keeps a file saved of just the images printed. In turn, this laptop was connected via a 50′ VGA cord to my LCD projector, which displayed the images on the wall, in the background.
Nikon D2X with 17-55mm lens. This worked great with the 9′ backdrop. Note: The Nikon battery needs to be changed twice within a four hour period. My first camera test was with my Canon 1Ds Mark II, and it worked fine too. I think that as long as your camera has a USB or Firewire out, you can make it work teathered just fine. I’ve not toyed with doing this wirelessly, altough I do have a wireless transmitter for both bodies. To maximize throughput of the files, I always shot at the smallest JPEG size, which still sends over a 2000 pixel wide file, suitable for an 8×10, if necessary at a later date.
One Autopole with tri-leg base. This allowed the entire setup to attach just to the pole, with pressure to the ceiling and the floor, and the added stability of the tri-leg to ensure it all wouldn’t fall over. The gold wiring at the top was where I disassembled the ceiling fixture that hung over the table, and clamped the wires up out of the way. That pole is under pressure with the rubber foot on the top holding it up to the cieling. Note part of the tri-leg base at the bottom of one of the photos.
Two Mathelini clamps on opposite sides of the pole to attach the lights to, just above the camera’s superclamp, and just below the autopole’s tensioning lever. This was the easiest way to connect the 40″ extension arms that held the lights.
Two Hollywood Heads with 40″ extensions on them to attach the lights. This was important because I didn’t want people tripping on the lightstands for the heads/umbrellas. (note the one lightstand in one of the photos is not holding up the head, it’s just standing back there as it was a prop for an earlier picture.)
One Superclamp and Bogen geared head tripod head with quick release plate. Mine is an older model, the 410 Junior. This head is important because there is no loosening, adjusting, and then tightening if you wanted to raise or lower the angle, just dial the gear and it always stays tight.
One Hensel Vela 1500 pack, with two heads, at about 1/4 power. Fast recycle ensured. Two Hensel 3000 heads. You could use lighter Monobloc heads if you’d like. Just make sure you hardwire them, as lots of people like to take their own snaps, and you want to ensure the heads only trigger to your camera. This may require a Y-splitter for the wiring. I suppose you could also use a Dynalite pack with two heads too.
Two Wescott silver umbrellas, about 30″ in diameter.
One wired remote for the camera so people could do self-portraits.
One superclamp with a U-hook on it so that people could return the wired remote to it’s correct place below the camera for the next guest.
At one point, we used Pocket Wizards to trigger the pack by the camera, but switched to hard wired when the batteries ran out and we’d forgotten AA’s.
Note that the equipment is raised off the table during the party with equipment cases, incase anyone spilled a beer. It didn’t happen, but we wanted to be safe!
LCD Projector – Standard Epson projector, raised to the cieling with an autopole, and connected via superclamp and Magic Arm to a Bogen accessory tray that held the projector (like their Video Monitor Tray 3152, or their accessory tray FF0844.) This projector made a big difference, as people who were not in the photo booth could see what their friends and colleagues were up to, and served as a form of “performance platform” for people to try a variety of off the wall things in a very freeform way. You can see the projected images in one of the photos past the autopole in the background.
Paper was standard 9′ superwhite Savage brand, used for both the backdrop wall, and the projected image wall. All paper was taped up, eliminating stands that people could trip on.
Note that it is not my plan or intention to go into the photo booth business. I figured this rig out because I wanted to do something fun at the NSC, and it may make it’s way to another upcoming photographer’s gathering. However, I like the ability to be able to offer this type of service to my regular clients, when requested, and, more importantly, to be able to produce reprints in house for those clients who need printed pieces.
So, why use this rig? Why invest in the software? Because when subjects have to wait even a minute or two, they will wander off, and not return for their print. If it’s in a corporate convention center booth, you want the corporate sales person wrapping up their dialog with the prospect as the print is printed in under 30 seconds. Further, in a closed environment, like a wedding, the ability to pass around and share with others, will increase the interest at the event of getting a print. In fact, you could sell this service as what the bride and groom give as favors!
I’ve assembled a complete list of what’s needed. Clicking on the links below completely pre-populates the e-mail with what you need, as noted above, To get your own Sony DR150 printer, click to reach Steve at ImagingSpectrum.com. To get the TEPS-X software, click for Tim at TriPrism. And, for all the hardware, click Jeff Snyder, at Penn Camera. While the Penn list does not include the camera, lens, or laptop(s), because I am assuming you have suitable stand-ins for them, they sell those too, just ask.
So, what should you charge for this? Hmmm. I’m still working on that. My general sense is that, to spend a day for a client, including you as the photographer (also shooting other things), an assistant to hit “print” and attend to the rig, and all the media (which is probably 300 to 400 prints a day), the cost should be somewhere around $2,500 for the day, all in. I may change my mind on this figure, but I’ll work through it, and let you know. This would, of course, be where you were “giving away” to subjects all the photos, which, in the end, is covered by the client who hired you. If you’re doing prints where you are selling them individually, the model I have to go by is the photo kiosks that charge $10 for a 5×7, and $25 for an 8×10, but I have not fulling investigated those figures enough yet. More on pricing later.
Please post your comments by clicking the link below. If you’ve got questions, please pose them in our Photo Business Forum Flickr Group Discussion Threads.
Originally published on Photo Business News & Forum on March 14, 2007. Comments are closed; this post is part of the archive.
Clayton
It’s amazing at $305. The thing is, you’re writing a check for like $1800 or so, BUT, you get so much free media that it reduces the net cost of the printer to $305, but only until the 31st.
http://www.breezebrowser.com sells PSremote which is a $50 program that can be combined with a canon G2 or G3 $150 camera from http://www.keh.com that allows one to automatically and instantly take images and export them to a photoshop action/droplet. If you are good at that kind of techy stuff, otherwise the nice guy over at http://www.photoboof.com will sell you some killer windows software for photobooths at a price 10x the cost of psremote.
I just did an Automatic GREEN SCREEN for an MTV sweet sixteen party and it was a huge hit.
Peace, Rolland
reATrollandelliott.com
Unlike Imaging Spectrum, EventPhotoMarket.com, is a company that actually uses the equipment they sell. They also give you 24/7 tech support for when you need it the most!!
I believe you said that you went to SEPCON/Imaging USA. Well, if I am not mistaken the owner of EPM started SEPCON.
EPM is a company that actually cares about the future of our industry and Event Photographers. Call Imaging Spectrum and ask them waht they have done for our industry lately (or ever for that matter!)
I say this only because if it wasn’t for EPM and their great support system I would not be here and thriving!! Imaging Spectrum just keeps calling and trying to sell me something – with no support!! Thanks! But, no thanks!
Bob Coulter – Just another concered Event Photographer!!
Unlike Imaging Spectrum, EventPhotoMarket.com, is a company that actually uses the equipment they sell. They also give you 24/7 tech support for when you need it the most!!
I believe you said that you went to SEPCON/Imaging USA. Well, if I am not mistaken the owner of EPM started SEPCON.
EPM is a company that actually cares about the future of our industry and Event Photographers. Call Imaging Spectrum and ask them waht they have done for our industry lately (or ever for that matter!)
I say this only because if it wasn’t for EPM and their great support system I would not be here and thriving!! Imaging Spectrum just keeps calling and trying to sell me something – with no support!! Thanks! But, no thanks!
Bob Coulter – Just another concered Event Photographer!!
A rhetorical question I guess, I never got a good answer.
Thanks for all of your hard work John –
Chris
I have documentation of the whole process and some of the shots on our blog, in the photobooth category.
Thanks for sharing!
http://charlotte.bbb.org/WWWRoot/SitePage.aspx?site=44&id=c982dd34-581b-42fc-bfc2-f695fa0b1fbf&art=6009
He is also under investigation for fraud by the North Carolina Attorney General.
apple a1185 white battery
apple a1185 black battery
He also continues to be under investigation by the North Carolina Attorney General.
This is not slander. It is fact.
薬剤師求人
225
システムトレードFX
ユーザー車検
ロールケージ
システムトレード日経225先物
金先物
出産手当金 申請
FX情報商材
レーシック失敗
大分車検・車内クリーニング
エアロバイク
電子タバコ
ロールケージ
マルコ
茨城 薬剤師 求人
出産一時金
割引コードもしもチャレンジ
dodongadon
外国為替証拠金取引(FX)ニュース
為替でドン!
FXで天国と地獄
FX情報商材で勝ち組に・・・
FXのスワップで暮せるものか?
FXを極める⇒億万長者
外国為替証拠金取引(FX)をがっつり極める
FXで上流階級
FXでセレブポン
スワップでポン♪FXやってみるかね。
FX大好き少年
為替王信者とFX友の会
外国為替証拠金取引マニア
コツコツFXでいきましょう
外国為替証拠金は恐ろしい
FXでスワップ生活
FXでなんぼのもんじゃい
なんでも適当日記
ひとりごとブログ
気になるもの日記
ちょっとびっくりな話題
最新の話題を追ってみよう
気になるトピックなどなど
話題ネタ
話題ネタなど
気になったものを書くdeviの日記
気になるトピック
お気に入りブログを紹介
最近の気になることを…
最近の話題を語る
気になったものすっぽんブログ
話題で気になるもの
なんでも話題にしましょうブログ
気になっている話題とネタ
おもしろブログサイトかき集め
FXスワップ命
FX・為替ニュース
FX業者マニア
気になる~.net
最近の話題をつかもう
いろいろ話題NEWS
FXでスワップウマー
FX初心者脱却までの道のり
FX為替差益三昧
FXでOL脱却♪
FXで勝ち組に
FXで旦那の収入を抜いてやる♪
FXなら必勝♪
FXで億万長者
話題の庭
最近気になるもの
中洲風俗
中洲ソープ
ミニチュアダックス
カード、キャッシング
湘南の風
米軍基地
やせマッチョ
猫
イオナ 通販
ベビーベッド ベビー用品 通販
女性用コンドーム
デジタルフォトフレーム
電子タバコ通販
禁煙方法
sbbn011
羽毛布団
ブルブルマシーン
フェイシャルヨガ
トレーサー
ネット レンタル ビデオ
マスターベーション
ワキの臭い